Introduction
Building a functional, safe birdcage with wire mesh is one of the most satisfying DIY projects I’ve tackled as a bird owner. After years of buying overpriced, poorly designed store-bought cages that lacked proper ventilation, felt cramped, and were impossible to match my home decor, I switched to fully custom handmade enclosures. Wire mesh has become my go-to material—flexible, long-lasting, chew-resistant, and perfectly breathable for pet birds.
Having built three distinct styles of mesh birdcages for my finches and parakeets over the years, I’ve learned practical tricks, fixed costly mistakes, and refined every step for beginner-friendly results. This hands-on guide shares my real-world experience, critical safety tips, and easy-to-follow steps to help you craft a sturdy, species-friendly birdcage tailored to your space and your feathered pets’ needs.
Step 1: Measure and Cut Wire Mesh Accurately
Precise measuring is the foundation of a sturdy cage, and this is where I made my first big DIY mistake. Early on, I cut mesh panels to exact dimensions with no extra allowance, leaving tiny gaps between joints that small birds could squeeze through and escape. Now I always plan with overlap in mind for secure assembly.
First, base your measurements on your chosen cage foundation:
-
Cylindrical designs: Measure the full circumference of your planter base to calculate mesh height and width.
-
Rectangular designs: Measure each side, top, and base frame individually for paneled construction.
Use sharp wire snips for clean, burr-free cuts—rough, jagged mesh edges can scratch birds’ feet and wings. Leave a 1–2 inch overlap on all connecting edges; this extra material makes sealing seams simple and eliminates risky gaps. Always double-check sizing before cutting, as wire mesh cannot be resized easily once trimmed.
Step 2: Form the Cage Enclosure to Fit Your Design
Wire mesh’s flexible structure lets you create two practical, popular enclosure styles, each with unique benefits I’ve tested long-term:
-
Cylindrical Living Cage: Roll a single sheet of mesh into a seamless tube. This is my favorite design for live plant setups. I use this style around my indoor potted ficus tree, creating a natural, open-air habitat that blends seamlessly with indoor greenery. The rounded shape reduces stress for skittish small birds, with no sharp corners to bump into.
-
Paneled Rectangular Cage: Bend flat mesh sheets or fasten separate panels to a wooden frame or plastic crate base. This rigid style is ideal for permanent indoor placement. I built a rectangular mesh cabinet cage for my parakeets, and its structured shape fits perfectly against living room walls without wasting space.
Step 3: Secure Seams & Joints (Critical for Bird Safety)
Loose seams and weak fasteners are the top safety hazard for homemade birdcages. Through trial and error, I’ve narrowed down the most reliable fastening methods for mesh construction:
-
Nylon Zip Ties: My daily-use favorite. Heavy-duty white UV-resistant zip ties work best for stitching mesh edges together. Avoid thin, cheap ties—my birds easily chewed through low-quality plastic within days. Space ties every 2 inches along seams for maximum stability.
-
Heavy-Duty Staples: Perfect for wooden-framed aviaries. I staple mesh flush against wood frames to prevent loose wiring. Be sure to hammer down staple ends completely to stop sharp metal points from injuring birds.
Never leave open seams or loose wire ends exposed; take extra time to reinforce high-tension areas where birds often perch or climb.
Step 4: Install Access Doors & Optimize Ventilation
Poor ventilation is a common flaw in commercial cages that leads to mold, odors, and respiratory issues for birds. My custom mesh designs solve this issue, and I balance airflow with clear viewing and easy daily access.
For large wooden-frame aviaries, I highly recommend clear acrylic or glass front doors paired with mesh side and back panels. This combination offers unobstructed viewing for daily interaction while cross-ventilation from mesh walls keeps fresh air circulating. I added hinged acrylic doors to my cabinet-style cage, making cleaning, feeding, and bird handling quick and simple.
For small all-mesh cylindrical or crate cages, cut a custom fold-out door directly into the mesh wall. Reinforce the door edges with extra wire or zip ties to prevent bending, and add a simple clip latch to stop curious birds from pushing the door open.
Step 5: Interior Setup & Bird Enrichment (My Go-To Habit Tips)
Many new DIY builders focus only on cage structure and overlook interior enrichment—but happy, healthy birds need a natural, engaging environment. Based on my daily bird care routine, here’s how I outfit every custom cage:
-
Natural Perches: Skip plastic store-bought perches that cause foot soreness. I secure thick, untreated tree branches horizontally across mesh walls or use existing limbs from live potted plants inside cylindrical cages. Natural wood supports healthy foot grip and reduces stress.
-
Nesting Spots: Woven grass baskets and hollow coconut shells are my top picks. I hang these from mesh ceilings with sturdy wire hangers; my finches regularly use these cozy spots for resting and nesting year-round.
-
Feeding & Water Stations: Clip external gravity feeders and water dispensers directly to the wire mesh exterior. This keeps food and water clean, cuts down on interior mess, and makes refilling fast without opening the cage.
3 Practical Wire Mesh Cage Designs (Real Usage Experience)
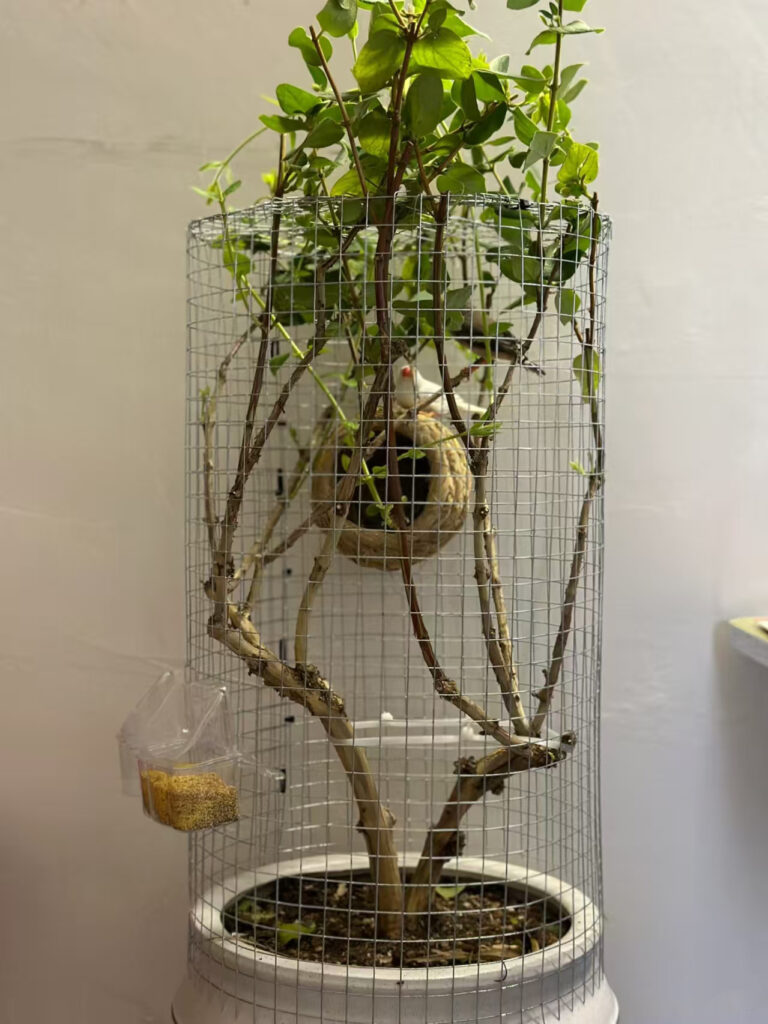
1. Cylindrical Living Plant Aviary
This is my most low-maintenance design, built around a heavy ceramic planter and live indoor foliage, perfectly suited for small finches and soft-billed birds.
-
Stable Base: A weighted ceramic pot filled with nutrient soil and a leafy, strong-branched plant prevents tipping, even with active birds climbing the mesh walls.
-
Mesh Structure: One sheet of galvanized small-gauge mesh rolled into a tall cylinder; fine wiring prevents tiny birds from getting their heads stuck.
-
Assembly Method: Vertical seams sealed with clear heavy-duty zip ties. The bottom mesh edge tucks slightly into planter soil for steady placement.
-
Daily Use Perks: Integrated plant greenery creates a calming natural habitat, external feeders keep the space tidy, and suspended grass nests require zero extra floor space.
2. Wooden-Framed Cabinet Aviary
I built this permanent furniture-style cage for long-term indoor use, ideal for parakeets and medium-sized pet birds. It doubles as home decor instead of an eyesore.
-
Sturdy Frame: Polished bamboo or solid wood framing delivers rigid support for large mesh panels and heavy accessories.
-
Ventilation Design: Breathable wire mesh lines the sides and back, while clear hinged acrylic doors cover the front for full visibility.
-
Functional Upgrades: I installed rolling caster wheels on the base, letting me move the entire aviary easily for deep cleaning. A built-in bottom shelf stores bird seed, cleaning tools, and replacement accessories neatly.
-
Long-Term Benefit: The solid frame lasts for years, and mesh panels are easy to remove and replace if damaged.
3. Industrial Crate-Base Mesh Cage
This modular, budget-friendly design is my go-to backup and breeding cage, designed for easy deep cleaning and mess control.
-
Durable Base: A thick plastic storage tote contains bedding, soil, and waste, eliminating messy floor cleanup common with open-bottom cages.
-
Modular Mesh Housing: Separate rectangular mesh panels connect to form a box-shaped top that locks securely onto the crate rim.
-
Interior Layout: Deep base space allows for natural ground cover like grass and soil. Thick wooden branches wedge between mesh walls for stable perches, and hanging coconut nesting shells add comfortable shelter.
Key DIY Cage Tips & Beginner Mistakes to Avoid
1.Prioritize Bird-Safe Materials: Always use non-toxic galvanized mesh, untreated wood, and chemical-free natural materials. I once used treated lumber by mistake, which caused minor irritation for my birds—stick to pet-safe supplies only.
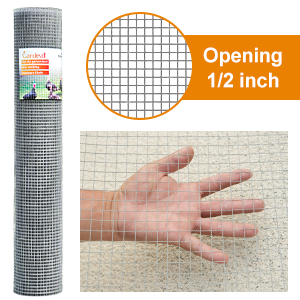
2.Control Gap Sizing: Choose small-gauge mesh to prevent head entrapment or escape, a critical detail for small bird species.
3.Balance Cleanliness & Comfort: Crate-base designs are best for easy sanitizing, while plant-based cylindrical cages work better for low-mess, low-waste bird breeds.
4.Avoid Overcrowding: Custom sizing lets you build a spacious enclosure; never cut corners on space to save materials.

Conclusion
With affordable wire mesh, basic tools, and simple planning, anyone can build a durable, pet-safe custom birdcage that outperforms generic store options. After relying on DIY mesh enclosures for years, I’ve found these custom designs offer better airflow, safer materials, personalized sizing, and seamless integration with home decor.
Whether you want a natural plant-centered aviary, a stylish wooden cabinet cage, or an easy-clean modular crate design, wire mesh adapts to every need. This DIY method not only saves money but also lets you craft a calm, enriching living space that keeps your pet birds healthy, comfortable, and secure all year long.